
You sit at your desk. You stare at a massive sidebar of past AI conversations. Code snippets, recipe ideas, and half-written emails clutter your screen. Consequently, you realize OpenAI has a vast archive of your personal data.
Therefore, you decide it is time to clean the slate. Learning how to delete ChatGPT account data is a necessary privacy step. Next, you need a clear exit strategy. Leaving old accounts active exposes your data to future breaches.
Thus, taking control of your digital footprint matters. We will walk through the exact removal process. First, we cover data backups. Then, we handle subscriptions. Finally, we execute the permanent deletion.
By the End
You will successfully permanently erase your OpenAI profile. Specifically, you will have a downloaded archive of your past prompts. You will have a canceled Plus subscription. Finally, you will have a fully deleted account. Therefore, your personal data will no longer reside on their active servers.
Before You Start
- Active broadband internet connection.
- Desktop web browser. We recommend Chrome 115+ or Safari 16+.
- Your OpenAI login credentials. This means your email and password, or your SSO provider.
- Access to the email inbox associated with your profile.
- 15 minutes of dedicated, uninterrupted time.
- A desktop or laptop computer. The mobile app lacks some required export features.
- A secure place to store your exported data ZIP file.
Step 1: You must cancel active premium subscriptions first.
First, you must stop any recurring billing. OpenAI does not automatically refund unused time if you terminate a profile early. Therefore, you have to downgrade your plan manually before proceeding with the final removal.
Otherwise, you risk unexpected credit card charges next month. Consequently, handling billing first protects your wallet. You should never delete a profile with an active subscription attached. Thus, we start here.
- Log in to your main dashboard using your credentials.
- Click on your profile picture in the bottom left corner.
- Select “My Plan” from the pop-up menu.
- Wait for the billing portal to load completely.
- Click “Manage my subscription” under your current plan details.
- Select “Cancel Plan” on the Stripe checkout page.
- Confirm your choice in the final prompt.
✅ Check: Your billing page displays a message stating your plan will not renew at the end of the current billing cycle.
Step 2: You should export your conversation data.
Next, you want to save your historical prompts. Once you learn how to delete chatgpt account access, you lose all previous chats instantly. Consequently, downloading a backup ensures you keep valuable research or code snippets.
Later, you can reference these files offline. Thus, exporting is a crucial safeguard. You cannot recover these files later. Therefore, you must do this now.
- Open the main chat interface in your desktop browser.
- Click your profile icon in the bottom left corner.
- Select “Settings” from the menu options.
- Click on “Data controls” in the left sidebar menu.
- Find the “Export data” row in the main window.
- Click the “Export” button on the right side.
- Click “Confirm export” in the warning modal.
- Check your email inbox for the download link.
✅ Check: You receive an email from OpenAI containing a .zip file with your chat.html and conversations.json files.
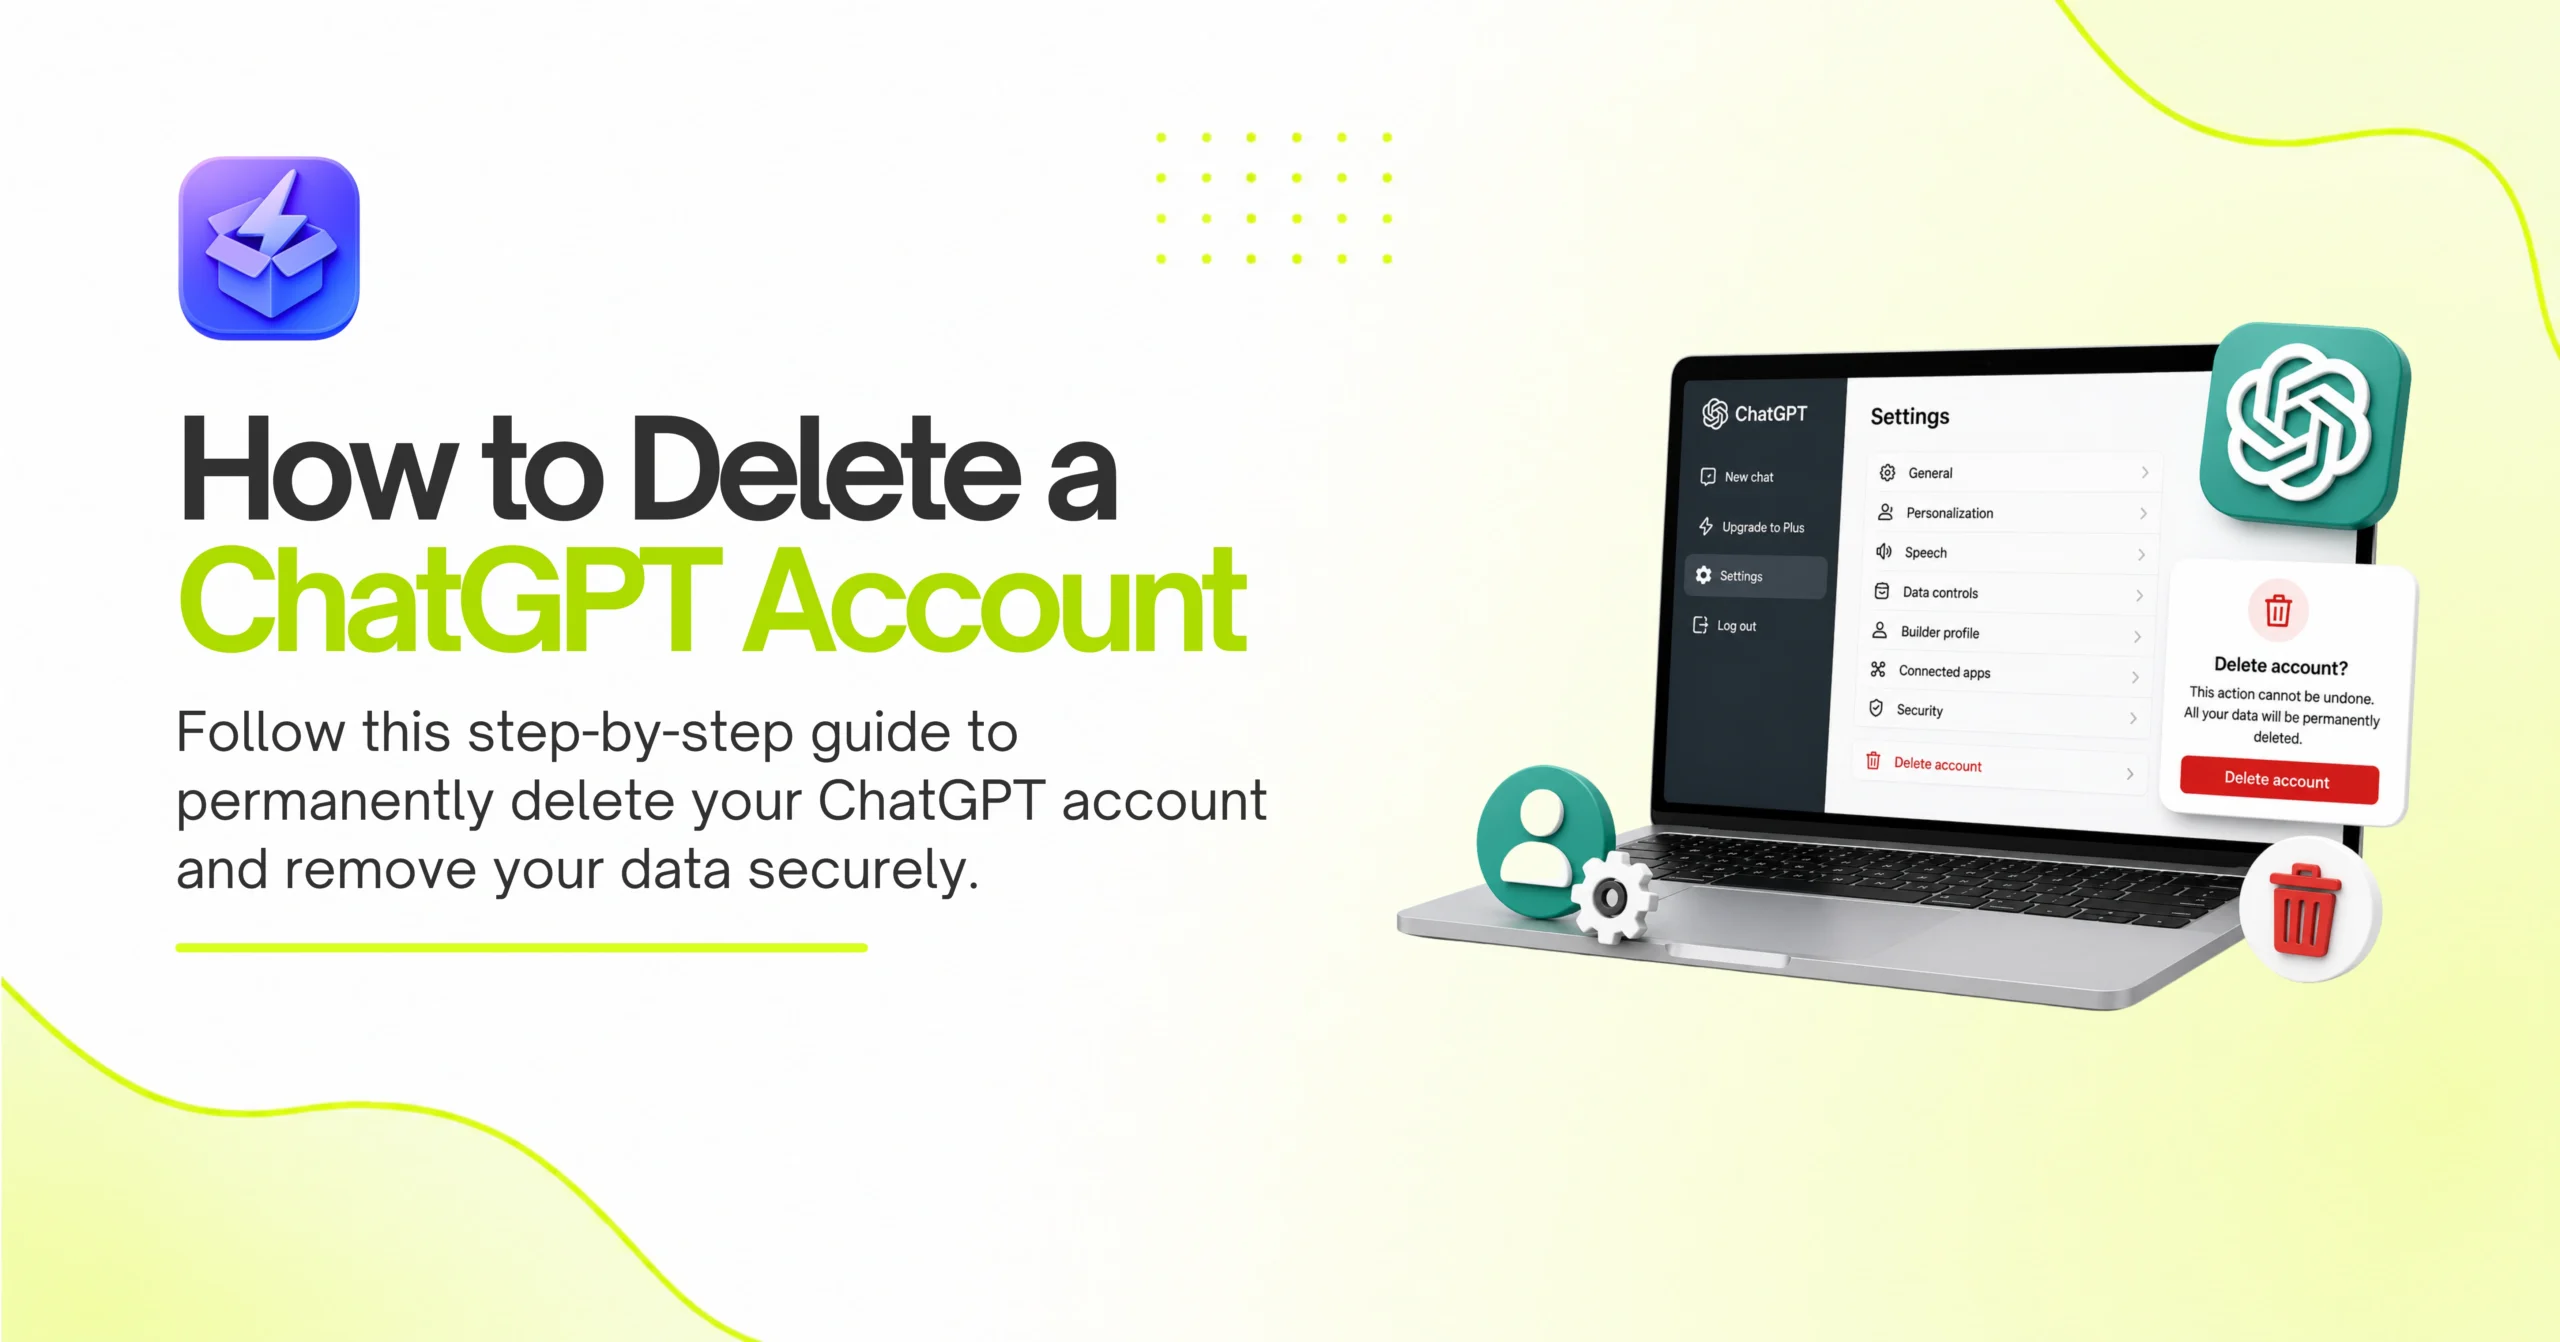
Step 3: You need to access the data controls menu.
Then, you must navigate to the specific privacy hub. OpenAI hides the permanent removal option deep within the user preferences. Specifically, this menu controls both temporary chat history toggles and permanent profile destruction.
Therefore, you must look carefully. Otherwise, you might just clear your chat history instead of deleting the profile. Clearing history leaves your account active. Consequently, you must find the exact deletion button.
- Return to the main chat screen.
- Click your profile icon again.
- Click “Settings” to open the preferences modal.
- Select the “Data controls” tab on the left side.
- Scroll down to the very bottom of this specific menu.
- Locate the red text indicating account removal.
✅ Check: You see a red button labeled “Delete account” at the bottom of the data controls list.
Step 4: You execute the final deletion request.
Finally, you initiate the permanent removal. This action is completely irreversible. Therefore, OpenAI requires you to type a confirmation phrase to prevent accidental clicks.
After this step, your access terminates immediately. Consequently, you cannot undo this action. You lose access to all custom instructions. Thus, proceed only if you are absolutely sure.
- Click the red “Delete account” button.
- Review the final warning screen carefully.
- Look at the specific word required for confirmation.
- Type the required confirmation word into the text box.
- Double-check your spelling to avoid errors.
- Click the final “Permanently delete my account” button.
✅ Check: The screen goes blank, and you are immediately redirected to the public OpenAI login page.
Step 5: You must revoke third-party app permissions.
Subsequently, you should disconnect external applications. Many developers use OpenAI API keys in other tools. Consequently, removing your main profile does not always revoke active OAuth tokens immediately.
Therefore, you must clean up your single sign-on providers. Thus, your security remains intact. Otherwise, hidden connections might persist. Accordingly, we check your Google or Microsoft settings.
- Log into your Google or Microsoft account if you used SSO.
- Navigate to the security settings of that specific provider.
- Find the “Third-party apps with account access” section.
- Locate OpenAI in the list of connected services.
- Click on the OpenAI entry to expand the details.
- Click “Remove Access” to revoke the token.
- Confirm the removal when prompted.
✅ Check: OpenAI no longer appears in your list of authorized applications in your email provider’s security dashboard.
Step 6: You must clear your local browser cache.
Next, you need to remove local session data. Browsers store cookies that remember your login state. Consequently, old cookies can cause weird redirect loops.
Therefore, clearing your cache ensures a clean break. Thus, you remove all traces of the application from your machine. Specifically, you want to target OpenAI cookies.
- Open your browser settings menu.
- Navigate to the privacy and security section.
- Click on “Site settings” or “Cookies and site data”.
- Search for “openai.com” in the search bar.
- Click the trash can icon next to all OpenAI entries.
- Restart your web browser completely.
✅ Check: Your browser no longer auto-fills your OpenAI login credentials when you visit their homepage.
Step 7: You verify the removal process worked.
Afterward, you need to confirm the system actually purged your credentials. Sometimes, cached server data makes it look like you are still logged in.
Therefore, testing your login proves the process succeeded. Hence, you gain peace of mind. You know your data is gone. Consequently, you can move on safely.
- Open a new incognito or private browsing window.
- Navigate to the official OpenAI login page.
- Enter your old email address.
- Enter your old password.
- Click “Log in”.
- Observe the resulting system message.
✅ Check: You see an error message stating “User does not exist” or “Wrong email or password.”
Regional privacy laws change how data disappears.
If you figure out how to delete chatgpt account details in Europe, the rules differ from the United States. Specifically, the General Data Protection Regulation (GDPR) enforces strict timelines. Conversely, US users face different retention policies.
Therefore, your physical location matters. Consequently, AI engines handle your deleted data differently based on your IP address. Understanding What Is the ZipTie AI Search Performance Tool? helps you see how LLMs surface scraped data.
Thus, knowing your local laws is vital. We compiled a comparison of how OpenAI handles deletion requests across different regions.
| Region | Governing Law | Active Data Deletion | Backup Retention |
|---|---|---|---|
| European Union | GDPR | 30 days | Up to 90 days |
| United Kingdom | UK GDPR | 30 days | Up to 90 days |
| California, USA | CCPA | 30 days | Up to 90 days |
| Rest of USA | Standard Policy | 30 days | Up to 90 days |
First, notice that the timelines look similar on paper. However, European users have legal recourse if OpenAI fails to comply. Therefore, EU users can file complaints with local authorities.
Next, US users outside of California rely entirely on company policy. Consequently, they lack formal legal backing for data erasure. Nevertheless, OpenAI generally applies the 30-day rule globally. Thus, your data eventually vanishes from their active servers regardless of location.
Troubleshooting
The export data button does not work
Sometimes, clicking the export button does nothing. First, disable any ad blockers you have running. Next, clear your browser cache completely. Then, try clicking the button again.
If it still fails, you must use a different web browser. Consequently, switching from Chrome to Safari often resolves this specific glitch. Therefore, testing another browser is the fastest fix.
You cannot log in to delete the profile
You might forget your password before starting. Therefore, you cannot access the data controls menu. First, click “Forgot Password” on the login screen.
Next, reset your credentials using your email. Then, log in with the new password. Finally, proceed with the deletion steps outlined above. Thus, you regain access just long enough to delete it.
The mobile app lacks the deletion option
You might try to delete your profile from your phone. However, the iOS and Android apps often hide or omit this feature. Therefore, you must use a desktop computer.
Specifically, open a desktop web browser. Then, log into the web version of the platform. Consequently, the required buttons will appear. Hence, desktop access remains mandatory.
You receive an active API key error
Developers often see an error preventing deletion due to active API keys. First, navigate to the API platform dashboard. Next, find the “API Keys” section in the menu.
Then, revoke and delete every single active key. Afterward, return to the main ChatGPT interface. Finally, attempt the account deletion process again. Therefore, clearing developer tools is required.
Your email remains in use after deletion
You might try to create a new profile immediately after deleting the old one. However, OpenAI blocks reuse of the same email address. Therefore, you cannot recycle your credentials.
If you need a new profile, you must use a completely different email address. Consequently, plan before you delete. Thus, you avoid locking yourself out of future accounts.
You used a school or work email address
Sometimes, enterprise accounts block user-initiated deletion. First, check if your organization manages your profile. Next, contact your IT department.
Then, request that they delete your profile from their admin console. Consequently, enterprise users cannot use the self-service portal. Therefore, you must rely on your internal administrators.
What to Do Next
Now that you know how to delete chatgpt account data, you should explore other options. First, you might want to test local AI models. Running models on your own hardware guarantees total privacy.
Next, you can look into alternative cloud providers. Grouping your tools by category helps organize your workflow. Specifically, check out our guide on AI Productivity Tools for secure alternatives.
Then, explore SaaS for Business platforms that offer enterprise-grade data protection agreements. Therefore, you can stay productive without sacrificing your privacy.